
How Fillvisa Works: Turning USCIS PDFs Into Smart Web Forms
Fillvisa helps immigrants easily fill USCIS forms. The traditional method - filling the PDF using Adobe is very difficult and oftentimes break; In this article, I've shared how I built Fillvisa forms. If you are a legaltech enthusiast, or, just curious about how Fillvisa works, buckle up!
Note: In this article, I'm talking about Fillvisa (fillvisa.com), the free forever version. We also have Fillvisa Plus (plus.fillvisa.com) that is the cloud version with additional features.
Table of Contents
- USCIS PDFs are broken (kinda)
- Steps
- 1. Converting the PDF from XFA to AcroForm
- Why AcroForms?
- 2. Adding Custom Fields Inside the PDF
- Why manual fields?
- 3. Rebuilding the Entire Form as a Web Replica
- Rebuilding every field, one by one
- 4. Autosave input
- 5. Loading the Data Back on Page Load
- 6. Full-Form Validation Before PDF Output
- 7. Mapping Web form data Back to PDF Fields
- 8. How Fillvisa Handles Signatures
- Saving the signature
- Reloading the signature on page load
- Why this matters
- What’s Next for Fillvisa
- Long-term vision
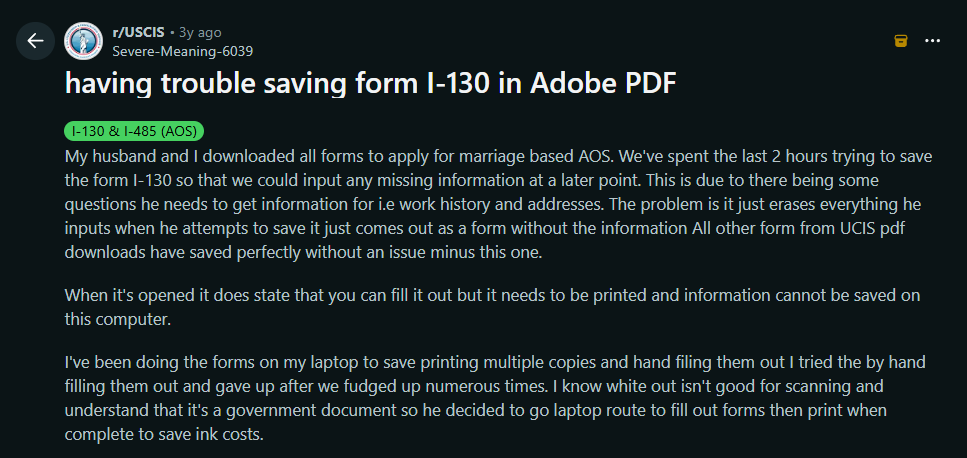
USCIS PDFs are broken (kinda)

Even with Adobe, the experience isn’t great. Many users have reported trouble in filling the forms inside Adobe: the responses don't get saved, some fields aren't fillable even inside Adobe, some forms are password protected.
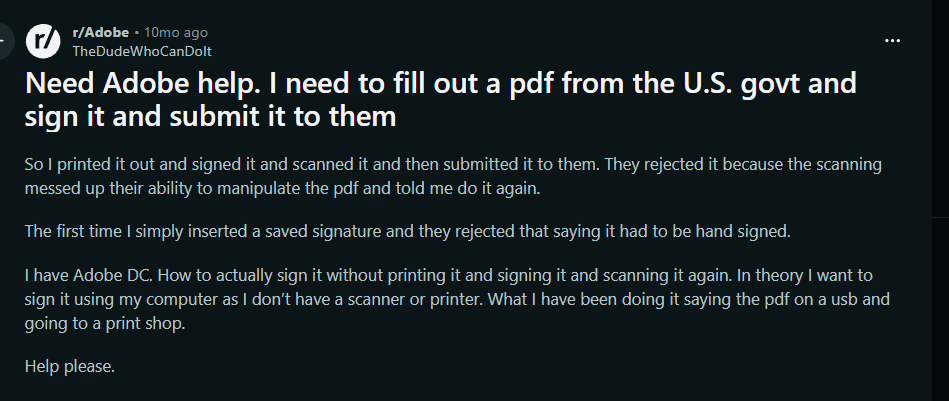
Finally, there’s the signature issue. USCIS does not accept digital signatures created with certificate-based tools. They want a wet signature - something drawn by hand, even if it’s drawn with a mouse, trackpad, or stylus. Acrobat technically supports freehand signatures, but the workflow is clunky and often restricted unless you’re paying for their upgraded plan.
I quickly realized that before creating the web-form, I need to first edit the USCIS PDF, and design a data schema. Here's what I did:
Steps
1. Converting the PDF from XFA to AcroForm
USCIS distributes most of its forms in XFA format. You can open/view an XFA format on your browser. However, you cannot fill the XFA form on the browser. For filling it, you need a 3rd party software like Adobe Acrobat. XFA PDFs are not accessible via code. If I want to map the data from a web-form to the PDF forms, I need to convert XFA PDF into an AcroForm PDF.
Why AcroForms?
AcroForms are the more universal, older-but-still-standard type of PDF form. Unlike XFA, AcroForms:
- can be parsed by open-source libraries like pdf-lib
- behave predictably across tools
- expose stable field names (critical for mapping data)
- don’t require Adobe Acrobat to function
For a web-based tool like Fillvisa, AcroForms are the only realistic foundation. Without converting the form, there is no way to read or place data reliably.
The process
Here’s the exact workflow:
Download the official USCIS PDF
Always the newest version, directly from uscis.gov.Open it in Adobe Acrobat Pro
(This is one of the few steps where Adobe is genuinely helpful.)Run Acrobat’s “Save As → PDF (AcroForm)” conversion
This strips out the XFA layer and produces a pure AcroForm version of the document.
Once the form is in AcroForm format, it becomes a technical canvas. Now pdf-lib can read it, Fillvisa can fill it, and the entire mapping system becomes stable.
2. Adding Custom Fields Inside the PDF
Once the PDF is converted to AcroForm, the next step is to make the form usable for a modern, code-driven workflow. Acrobat’s automatic field detection sounds helpful, but in practice it’s unreliable. It guesses wrong about 40 percent of the time - mislabeling inputs, missing fields, or creating inconsistent names that break any kind of automation.
So instead of relying on auto-detection, I manually rebuild and rename every field inside the PDF.
Why manual fields?
Because accuracy matters. When Fillvisa generates the final USCIS PDF, every answer needs to land in the exact right box. Stable and predictable field names are the key to that.
Inside Acrobat, I add form elements one by one:
text inputs
- date fields
- radio groups
- checkbox groups
- signature placeholders
For each field, I assign a clean, universal internal name like:
applicant_last_name
physical_address_city
travel_planned_yes_no
passport_expiration_date
previous_employer_1_name
What this achieves
By controlling the field names myself, Fillvisa gets:
A universal naming convention: every form follows the same logic.
- A stable mapping layer: the web form and PDF speak the same language.
- Schema portability: Fillvisa Free, Fillvisa Plus, and even future tools can all use the same data structure.
This naming layer is what makes accurate automation possible.
3. Rebuilding the Entire Form as a Web Replica
Once the PDF fields are stable and mapped, the next step is to rebuild the entire form experience on the web. The UI of a PDF is rigid and painful to use - tiny fields, awkward layouts, no responsiveness, and zero support for conditional logic. So instead of asking users to fight with that interface, Fillvisa recreates every page of the form as a clean, structured web experience.
And this isn’t a rough copy. It’s a full web-native replica, built with the Bootstrap library to ensure consistency, accessibility, and responsiveness across screens.
Rebuilding every field, one by one
Each input from the PDF becomes a proper web element:
text inputs
- dropdowns
- radio groups
- date fields
- checkboxes
Every layout decision is remade from scratch. Labels are clearer. Spacing is consistent. Fields are grouped logically. Validation is built in. It feels like a real application, not a static document.
Conditional logic that PDFs can’t handle
PDFs don’t support smart behavior, but the web does. So Fillvisa introduces gentle, intuitive conditional logic that mirrors the official instructions.
Examples:
“Have you used any other names?”
→ Reveal alias fields only when needed.

“Has anyone ever filed a petition for you?”
→ Show additional details dynamically.

“Is your mailing address the same as your physical address?”
→ Automatically hide or show the mailing section.

“List your previous employers”
→ Let users add entries dynamically without breaking the layout.
Validation
Validation is where the web form truly outperforms the original PDF. PDFs leave room for errors - wrong date formats, incomplete sections, missing fields, invalid email formats. Fillvisa fixes this by implementing validation rules that mirror USCIS expectations.
Validation includes:
Required fields
- Date formatting
- Character limits
- Conditional required fields
- Phone and email formatting
Everything runs client-side and instantly, giving immediate feedback before you ever download the final PDF.
The custom field-map
At the heart of this system is a custom field-map, a structured configuration that defines how each field should behave, validate, and display errors. Example:
const fields = [
    {
        id: "applicant_last_name",
        required: true,
        validate: v => v !== "",
        message: "Applicant/Petitioner Last Name is required."
    },
    {
        id: "applicant_first_name",
        required: true,
        validate: v => v !== "",
        message: "Applicant/Petitioner First Name is required."
    },
    {
        id: "applicant_middle_name",
        required: false,
        validate: v => true,
        message: ""
    },
    {
        id: "email_address",
        required: true,
        validate: v => /^[^\s@]+@[^\s@]+\.[^\s@]+$/.test(v),
        message: "A valid Email Address is required."
    },
    {
        id: "mobile_number",
        required: true,
        validate: v => /^[0-9]{7,}$/.test(v),
        message: "A valid Mobile Phone Number (at least 7 digits) is required."
    }
];
4. Autosave input
One of the biggest frustrations people mention with PDFs is losing progress. Acrobat crashes, the browser freezes, the laptop battery dies - and hours of work disappear. Fillvisa solves this with a universal autosave system that works across desktop, mobile, and tablets.
Every time the user types something, Fillvisa checks if the data actually changed:
function saveFormToLocalStorage() {
    const current = getFormData();
    if (JSON.stringify(current) !== JSON.stringify(lastSaved)) {
        localStorage.setItem("formData-3", JSON.stringify(current));
        lastSaved = current;
    }
}
Key features:
Debounced for performance (autosave feels invisible, never laggy)
- Saves only when something changes
- Saves page-wise (
formData-1,formData-2, …)
5. Loading the Data Back on Page Load
Autosave is only half the magic - the other half is restoring the form exactly as you left it. When the user opens the form again, Fillvisa rebuilds the page field-by-field:
function loadFormFromLocalStorage() {
    const saved = localStorage.getItem("formData-1");
    if (!saved) return;
    const data = JSON.parse(saved);
    Object.keys(data).forEach(id => {
        // fill the respective input
    });
}
Every text box, radio button, and dropdown returns to its previous state. Conditional sections open the way they were. Even long multi-page forms feel seamless.
This is what makes Fillvisa feel magical. You close the browser, come back three days later, and everything is exactly where you left it. Zero stress. Zero rework.
6. Full-Form Validation Before PDF Output
Before a user can download the official USCIS PDF, Fillvisa performs a complete validation pass across every page.
What it checks:
Every required field is filled
- Every conditional rule is satisfied
- Every page’s validation status is
true No broken or invalid data remains
Only after all pages pass validation does Fillvisa unlock the PDF output step.
USCIS forms are strict. Missing fields or formatting mistakes can lead to delays, rejections, or unnecessary back-and-forth. PDFs don’t warn you — they let you download a broken form.
Fillvisa prevents that. Your final PDF is always complete, clean, and ready to sign.
7. Mapping Web form data Back to PDF Fields
This is the part where everything comes together. After building the web form, validating it, and storing it locally, Fillvisa needs to place the user’s answers into the official USCIS PDF. This is where the schema becomes powerful.
The Mapping File
I create a simple JSON mapping layer that connects web form variable names to PDF field names:
{
  "applicant_last_name": "LastName_1",
  "applicant_first_name": "FirstName_1",
  "travel_planned_yes_no": "TravelYN",
  "passport_expiration_date": "PassExpDate"
}
This file acts as a universal translator. The web form doesn’t need to know how the PDF is structured. The PDF doesn’t need to understand the web form. The mapping layer sits in the middle and keeps everything in sync.
Using pdf-lib to Fill the PDF
Fillvisa uses pdf-lib - included directly in the browser:
<script src="https://unpkg.com/pdf-lib@1.17.1/dist/pdf-lib.min.js"></script>This allows the entire PDF generation process to happen locally, with zero server involvement.
Here’s a simplified version of the filling process:
async function fillForm() {
    const { PDFDocument, StandardFonts } = PDFLib;

    // 1️⃣ Load your static AcroForm PDF
    const formUrl = "g1145_acro.pdf";
    const existingPdfBytes = await fetch(formUrl).then(res => res.arrayBuffer());

    // 2️⃣ Load it into pdf-lib
    const pdfDoc = await PDFDocument.load(existingPdfBytes);

    // 3️⃣ Embed Helvetica font for visible field text
    const helvetica = await pdfDoc.embedFont(StandardFonts.Helvetica);

    // 4️⃣ Access the AcroForm
    const form = pdfDoc.getForm();

    // 5️⃣ Optional: Print all field names for debugging
    console.log("All field names:", form.getFields().map(f => f.getName()));

    // 6️⃣ Retrieve saved data
    const formData = JSON.parse(localStorage.getItem("demo") || "{}");

    // 7️⃣ Fill fields using mapping
    if (formData.applicant_last_name)
        form.getTextField("last-name").setText(formData.applicant_last_name);

    if (formData.applicant_first_name)
        form.getTextField("first-name").setText(formData.applicant_first_name);

    if (formData.applicant_middle_name)
        form.getTextField("middle-name").setText(formData.applicant_middle_name);
}
What the Mapping Layer Ensures
This system guarantees:
- Every web field goes into the correct PDF field
- Data types stay consistent
- Radio buttons and checkboxes convert to correct USCIS values (
Y,N, orX) - Dates follow USCIS format requirements (usually
MM/DD/YYYY) - PDF output is always complete and valid
No backend. No server. No upload.
All of this happens inside the browser:
The blank USCIS form is fetched
- Your data is inserted
- The final PDF is generated
- Nothing is uploaded anywhere
- Nothing is stored on a server
8. How Fillvisa Handles Signatures
USCIS does not accept digital certificate signatures. They require what’s called a wet signature - something drawn by hand, even if you draw it using a mouse, trackpad, or stylus. Adobe Acrobat supports this, but the workflow is awkward and sometimes locked behind paid features. Many users end up printing the form just to sign it and then scanning it back in.
Fillvisa solves this entire pain point with a native, browser-based signature system that works on desktop, touchscreen laptops, tablets, and mobile devices.
The signature pad
On every form that requires a signature, Fillvisa displays a clean signature canvas:
<canvas
    class="sign-pad"
    id="signatureClient"
    width="350"
    height="120"
    style="background:white;border:2px dashed #6c757d;display:block;margin:0 auto;">
</canvas>
Users simply draw their signature using a mouse or touch input. Behind the scenes, a few things happen:
- The canvas captures both mouse and touch events.
- Every stroke is smoothed and rendered consistently.
- The signature is saved automatically as a Base64 PNG inside localStorage.
How drawing works
const canvas = document.getElementById('signatureClient');
const ctx = canvas.getContext('2d');

let drawing = false;
let prevX = 0, prevY = 0;

// Convert mouse/touch input into canvas coordinates
function getPos(e) {
    const rect = canvas.getBoundingClientRect();
    const scaleX = canvas.width  / rect.width;
    const scaleY = canvas.height / rect.height;

    if (e.touches && e.touches.length > 0) {
        return {
            x: (e.touches[0].clientX - rect.left) * scaleX,
            y: (e.touches[0].clientY - rect.top)  * scaleY
        };
    }
    return {
        x: (e.clientX - rect.left) * scaleX,
        y: (e.clientY - rect.top)  * scaleY
    };
}
The drawing system:
- starts when the user touches or clicks
- draws smooth lines as they move
- saves the final signature only when drawing stops
This ensures fast, clean, responsive handwriting across devices.
Saving the signature
function saveSignature() {
    const dataURL = signatureClient.toDataURL();  // Convert to Base64 PNG
    localStorage.setItem("signature_client", dataURL);
    saveFormToLocalStorage(); // triggers autosave
}
This permanent-but-local attachment means:
- The signature never leaves the user’s device
- It reloads perfectly if the user revisits the form later
- No upload, no server, no risk
Reloading the signature on page load
const savedSignature = localStorage.getItem("signature_client");
if (savedSignature) {
    const img = new Image();
    img.onload = () => ctx.drawImage(img, 0, 0, signatureClient.width, signatureClient.height);
    img.src = savedSignature;
}
Embedding the signature into the official USCIS PDF
When generating the final PDF, Fillvisa places the signature exactly where the official form expects it.
Here’s the workflow:
- Locate the PDF form field reserved for the signature (
client_sign) - Extract its widget rectangle (x, y, width, height)
- Decode the Base64 PNG from localStorage
- Embed it into the PDF at the correct coordinates
- Hide the original field to avoid overlap
Simplified code excerpt:
const savedSig = formData.signature_client;

if (savedSig) {
    const sigField = form.getField("client_sign");
    const widget = sigField.acroField.getWidgets()[0];
    const rect = widget.getRectangle();

    const [x1, y1, x2, y2] = [rect.x, rect.y, rect.x + rect.width, rect.y + rect.height];
    const width = x2 - x1;
    const height = y2 - y1;

    const sigPage = pdfDoc.getPages().find(p => p.ref === widget.P());

    const pngBytes = Uint8Array.from(
        atob(savedSig.split(",")[1]),
        c => c.charCodeAt(0)
    );

    const pngImage = await pdfDoc.embedPng(pngBytes);

    sigPage.drawImage(pngImage, { x: x1, y: y1, width, height });

    sigField.setText(savedSig);
    widget.setRectangle({ x: -2000, y: -2000, width: 0, height: 0 });
}
Why this matters
- The signature is handwritten (wet), which USCIS accepts
- The PDF is valid and printable
- The signature is never uploaded to any server
- No Adobe is required
- Mobile users can sign effortlessly
Fillvisa turns the hardest part of the PDF - the signature - into the easiest part of the workflow.
What’s Next for Fillvisa
This post covers what Fillvisa is today. But there’s a lot more coming that will make the system more powerful, more consistent, and easier to extend.
Building a Universal Form Schema
Right now, each form has three partially separate layers:
- PDF schema - the field names I create inside Acrobat
- Web form schema - the IDs, validations, conditionals on the web interface
- PDF-mapping schema - the JSON mapping that connects web fields → PDF fields
It works well, but long-term, it should be one unified schema.
Why a universal schema matters
A single schema will allow:
- Consistent field definitions across forms
- Automatic validation generation
- Automatic PDF mapping generation
- Reusable conditional logic
- Easier maintenance when USCIS updates forms
- Faster building of new forms
- Cleaner developer documentation (eventual API)
- More reliable import (for Fillvisa Plus)
A unified schema will look like:
{
  "id": "applicant_last_name",
  "label": "Last Name",
  "type": "text",
  "required": true,
  "pdfField": "LastName_1",
  "validation": { "maxlength": 40 },
  "conditional": null
}
One definition → used everywhere.
Fillvisa will eventually have a schema directory containing JSON definitions for every field across all forms.
Covering More Forms
Fillvisa started with the most painful forms — DS-160, G-1145, etc. But the goal is bigger:
We plan to cover every major USCIS form
Users can already see the list on:
fillvisa.com/form
(Full directory of supported + planned forms)
The roadmap includes:
- Family-based forms (I-130, I-485, I-864, I-765, etc.)
- Citizenship/Naturalization forms (N-400, N-600)
- Work authorization forms
- Travel forms
- Green card renewal/replacement forms
- FOIA requests
- Employment-based forms
Every form will follow the same Fillvisa principles:
- Browser-only
- Autosave
- Accessible web layout
- Conditional logic
- Official PDF output
- Free forever
Fillvisa Plus
Long-term vision
A library of all USCIS forms, rebuilt for the modern web - while producing the official PDFs immigrants must submit.
Ultimately, Fillvisa becomes a transparent infrastructure layer that simplifies some of the most universally frustrating government paperwork.